Getting Started
Start hereWelcome to the Class Response System (CRS) — an AI-powered platform for collecting anonymous student feedback, analysing responses in real time, and mapping assessments to Course Learning Outcomes (CLOs).
I'm a Teacher
Register, create sessions, and analyse feedback with AI.
I'm a Student
Join a session with a code or QR and submit feedback anonymously.
Try the Demo
Explore a live demo without registering.
Want to try before you sign up? Visit the Demo section from the home page to experience the full student feedback flow without creating an account.
For Teachers
Registration & Login
Teachers self-register using an email address and password. After verifying your email you will be prompted to complete a short onboarding form before accessing the dashboard.
Create your account
Click 'Get Started Free' on the home page (or go to /register). Enter your institutional email address and choose a secure password, then click Register.
Verify your email
Check your inbox for a confirmation email. Click the verification link inside. Without this step you will not be able to log in.
Complete onboarding
On first login you will see a short onboarding form. Enter your full name and your institution name, then click Continue.
You're in!
You will land on the teacher dashboard. From here you can manage semesters, courses, question templates, and feedback sessions.
Complete the onboarding form carefully — your institution name appears on session reports and analytics exports.
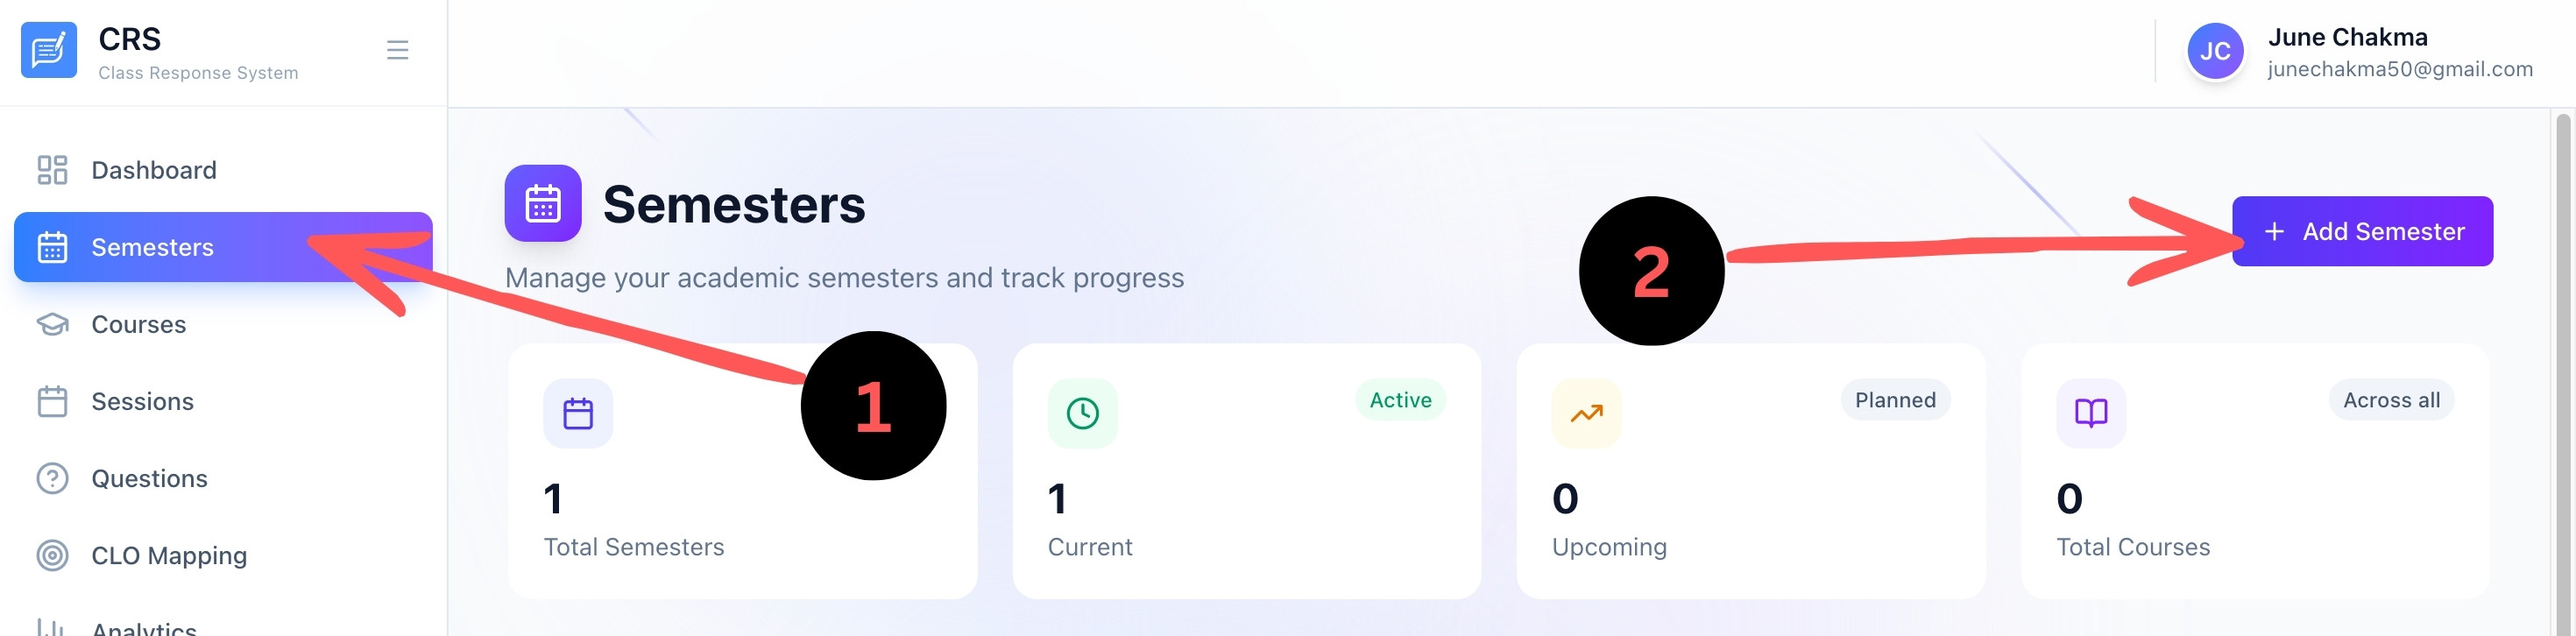
Step 1 — Add a Semester
Before creating courses or sessions you need at least one semester. Semesters group your courses by academic period (e.g. Spring 2025, Fall 2025).
Click "Semesters" in the sidebar
Find the Semesters entry in the left navigation panel of your dashboard and click it.
Click "+ Add Semester"
Press the green "+ Add Semester" button at the top right of the Semesters page.
Fill in the semester details
Enter the semester name (e.g. Spring 2025), select the year, and set the start and end dates.
Save
Click Save. The new semester will appear in the list and will be available when creating courses.
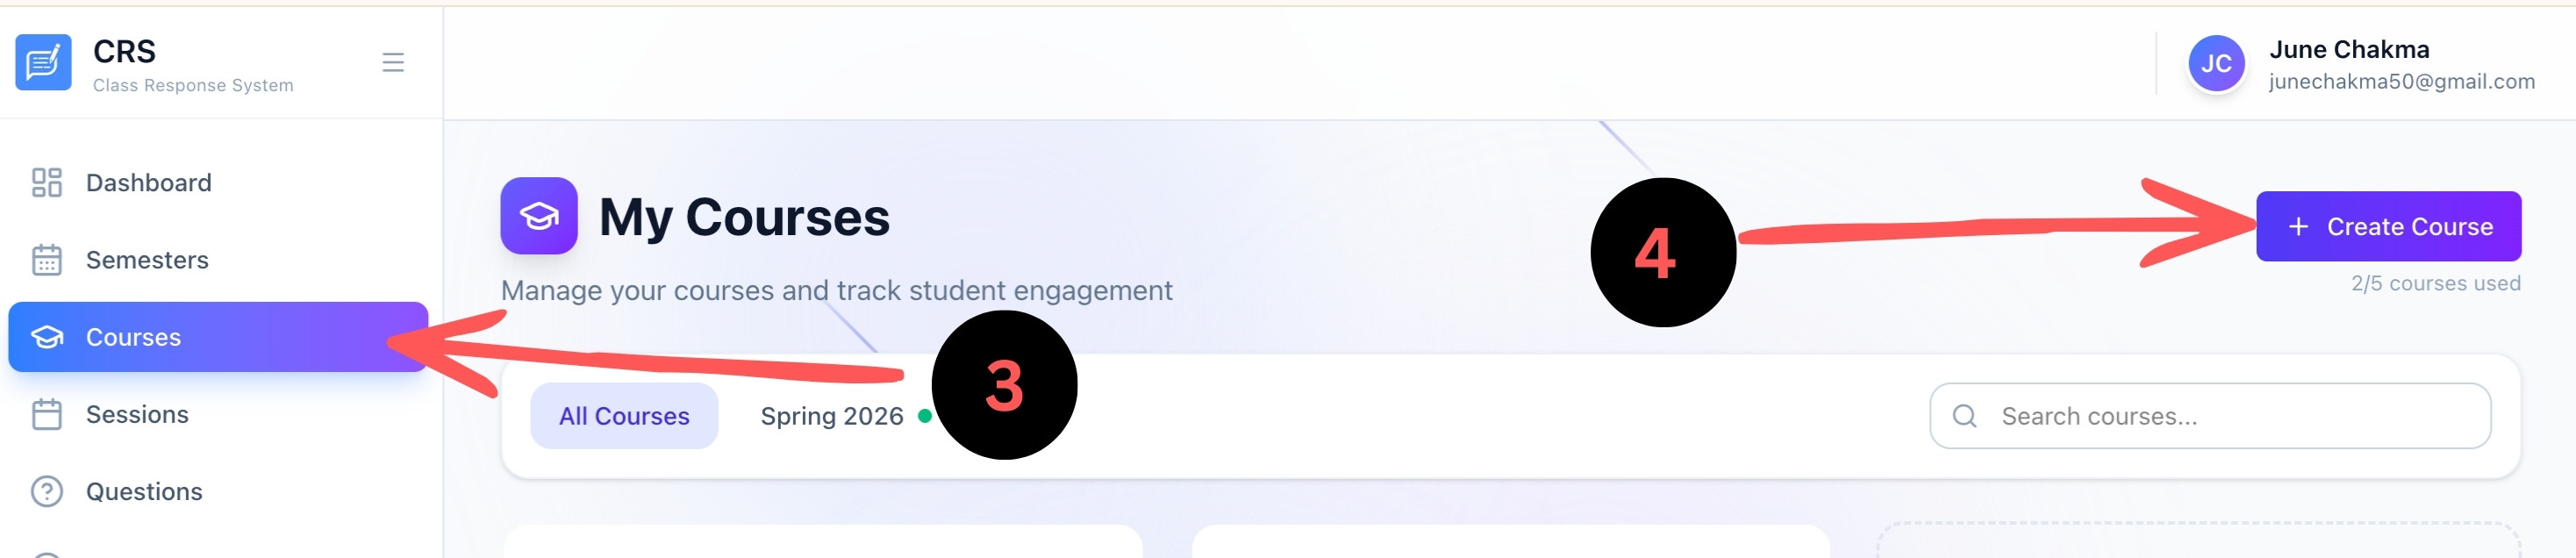
Step 2 — Create a Course
With a semester in place, add the courses you teach. Each session is tied to a specific course, so set these up before running any feedback sessions.
Click "Courses" in the sidebar
Navigate to the My Courses page from the left sidebar.
Select the semester
Use the semester filter tabs at the top of the page to select the semester you just created.
Click "+ Create Course"
Press the "+ Create Course" button. A dialogue will appear asking for course details.
Fill in course details
Enter the course name, course code, and any other required information, then click Save.
You can create multiple courses per semester. Each course can have its own question templates and independent feedback sessions.
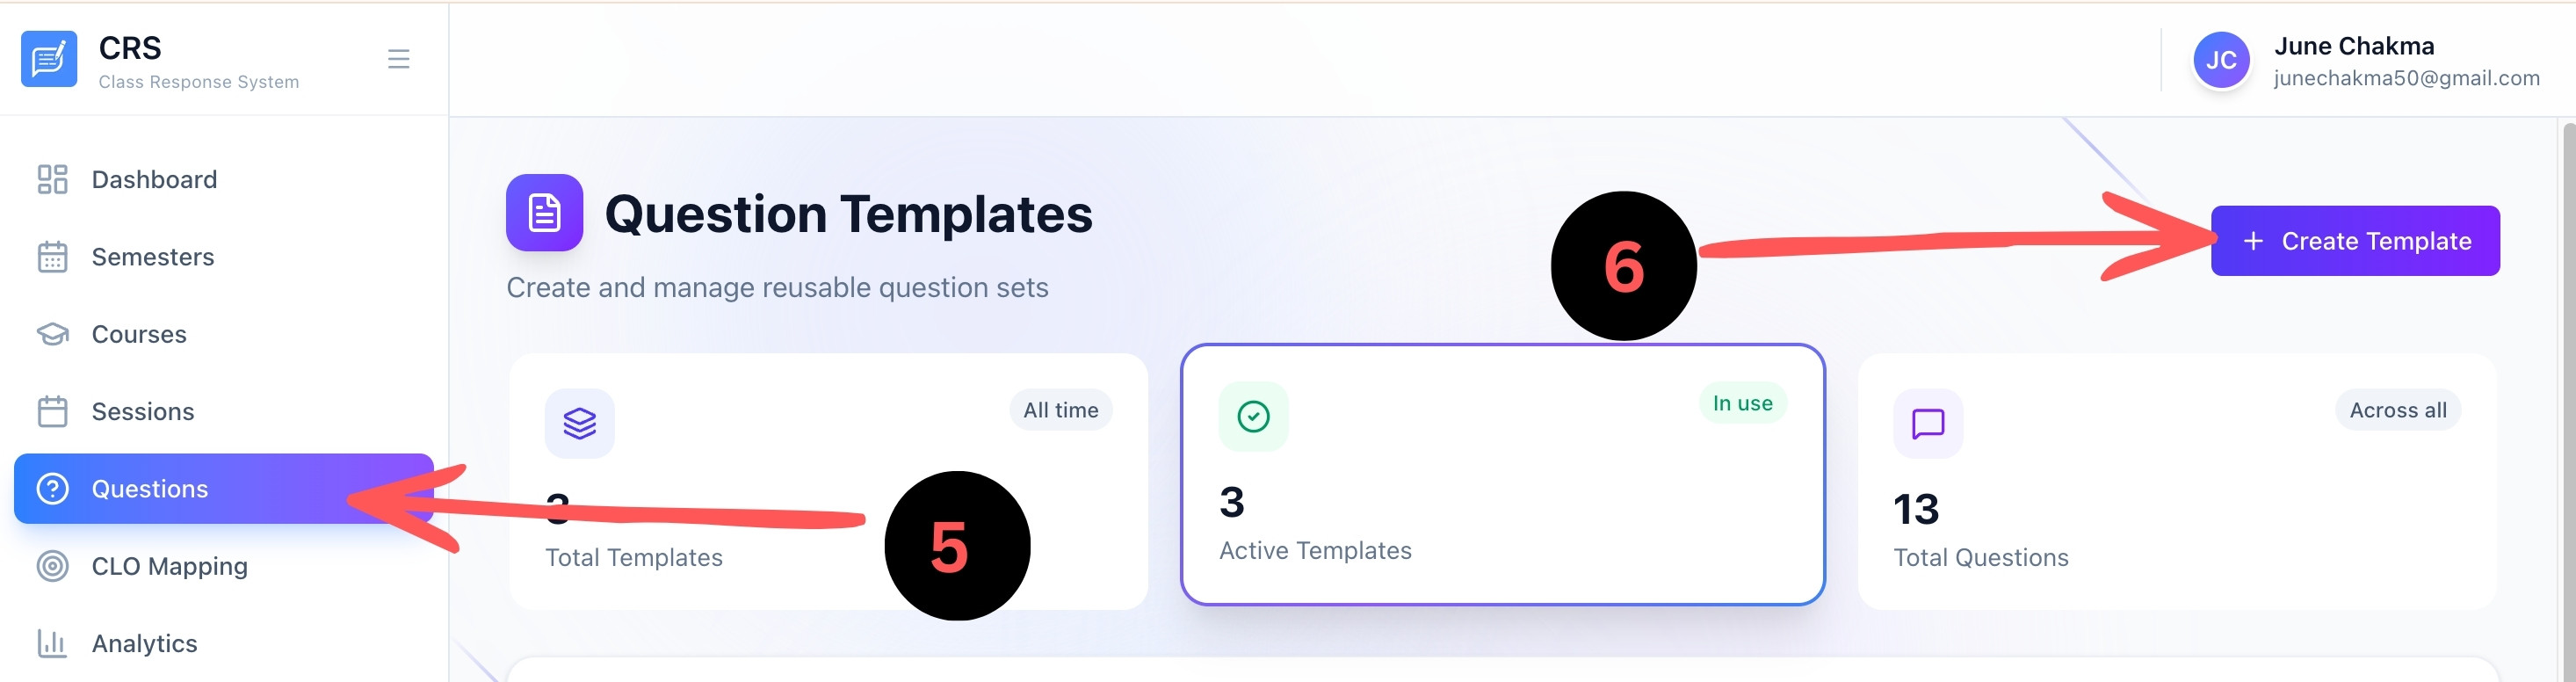
Step 3 — Create a Question Template
Question templates are reusable sets of feedback questions. You must assign a template to a session, so create one before launching your first session. Alternatively, you can use a base template already provided by the admin.
Click "Questions" in the sidebar
Navigate to the Question Templates page from the left sidebar.
Use a base template or create your own
If the admin has published base templates, they will appear in your list and can be used directly. Otherwise, click "+ Create Template" to build your own.
Name your template
Give the template a descriptive name (e.g. 'Week 5 Lecture Feedback') and an optional description.
Add questions
Click 'Add Question', choose a question type, fill in the question text, and repeat for each question you need.
Activate the template
Toggle the template status to Active so it is available for selection when creating sessions.
Admin-provided base templates are shared across all teachers. You can use them as-is or duplicate them to create your own customised version.
Supported question types:
Rating (1–5 Stars)
Ask students to rate clarity, pacing, difficulty, or overall satisfaction.
Yes / No
Quick binary questions — ideal for gauging understanding of a concept.
Multiple Choice
Provide 2–6 options. Useful for formative assessments or opinion polls.
Open Text
Free-form responses. AI analyses these for sentiment and themes.
Numeric
Collect numeric estimates (e.g. study hours, difficulty score 1–10).
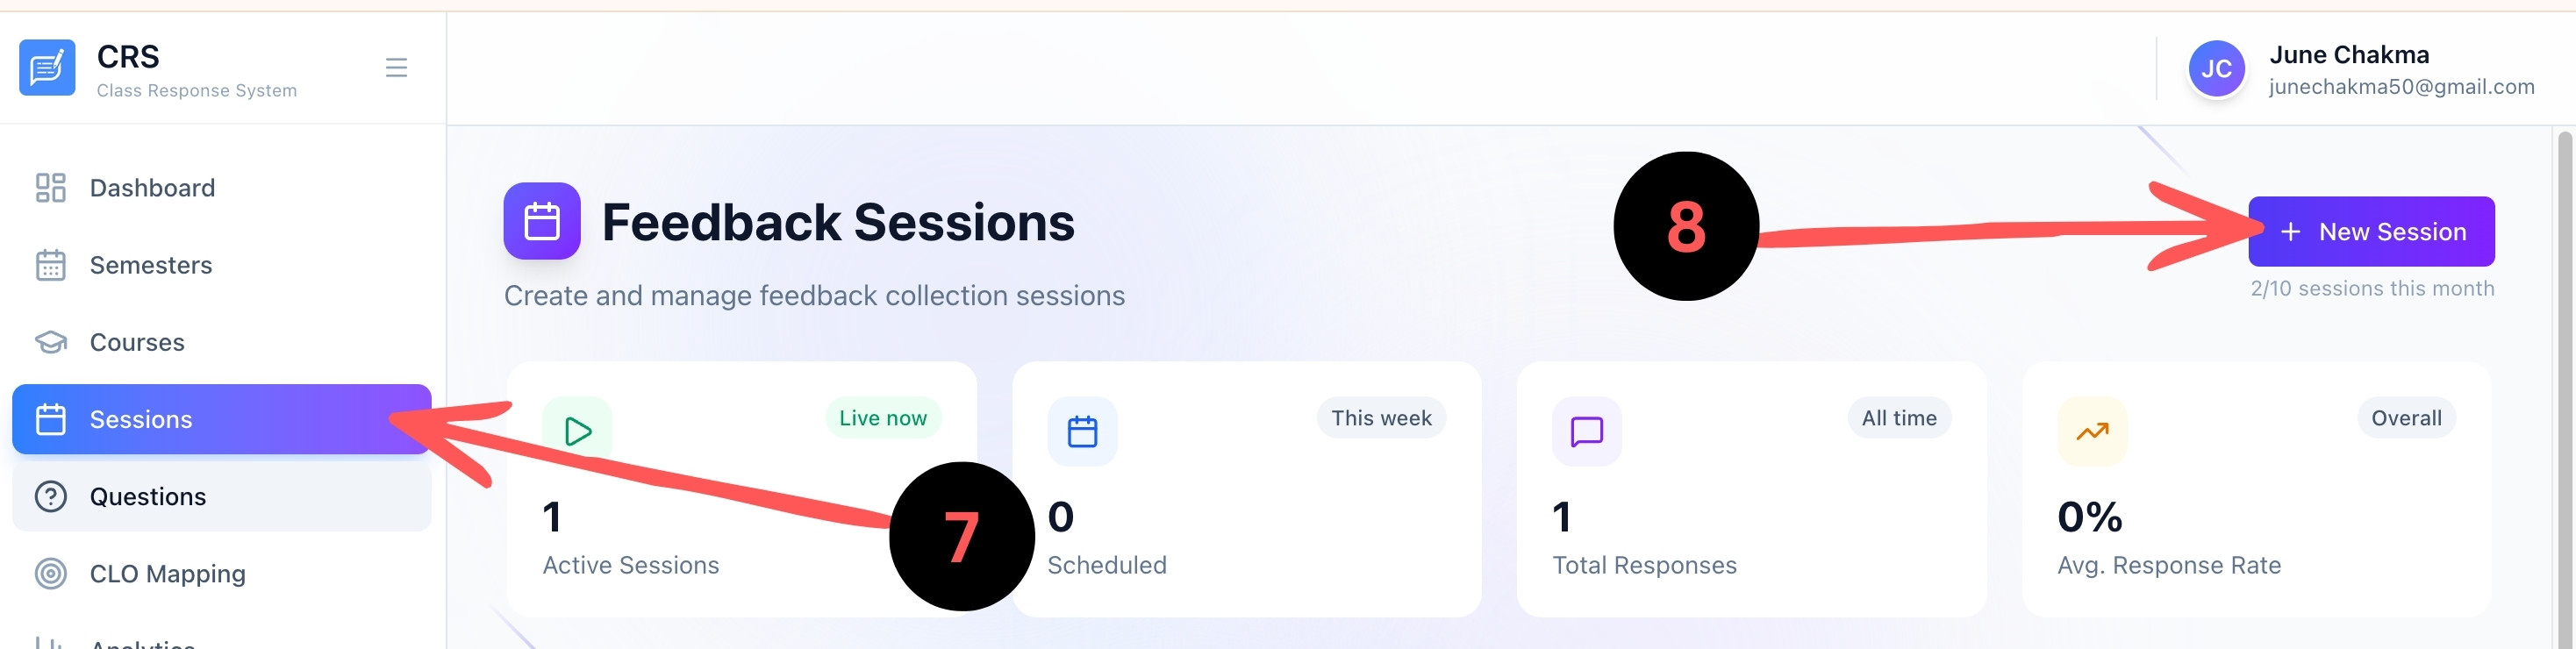
Step 4 — Create a Session
A session is a time-limited feedback window tied to a specific course and question template. Students join using the session code or QR code.
Click "Sessions" in the sidebar
Navigate to the Feedback Sessions page from the left sidebar.
Click "+ New Session"
Press the "+ New Session" button to open the session creation dialogue.
Select a course and template
Choose the course (from Step 2) and an existing question template (from Step 3), then give the session a title.
Set start and end time
Define when the session opens and closes. You can also set it to start immediately.
Launch
Click "Create Session". The system instantly generates a unique access code and QR code for students.
Sessions automatically change from Scheduled → Live → Completed based on the times you set. You can also manually start or end a session from the session detail page.
Session Access Modes
Every session has two access modes. You choose the mode when creating (or editing) a session.
Anyone who has the session code or QR code can submit feedback — no invitation required.
- No student list needed
- Students join with code or QR
- Best for in-class, open sessions
Only students whose email address is on the attached student list can access the session. Access is granted via a unique email link.
- Requires a Student List
- Students receive a personal email link
- Best for graded or controlled assessments
Setting up a restricted session:
Create a Student List
Go to Sessions → Student Lists and click "+ New List". Give it a name and add student email addresses one by one or by pasting a comma-separated list.
Enable Restricted mode
When creating or editing a session, toggle on "Restricted Access" and select the student list you just created.
Send invitation emails
After saving the session, click "Send Emails" on the session card. The system emails every student on the list with a personal, single-use access link.
Students click their link
Each email contains a unique token. When a student clicks the link they are taken directly into the session — no code entry required.
Monitor delivery
The invitation status panel (accessible from the session card) shows per-student delivery state: Pending, Sent, Failed, Opened, or Submitted. Failed emails can be retried with the "Retry" button.
Invitation email status explained
Invitation links are single-use and tied to a specific email address. A student who did not receive their email should ask the teacher to click Retry on the failed invitation, which will resend it.
QR Codes & Access Codes
Every session gets two ways for students to join: a short alphanumeric code (e.g. CR-8821) and a scannable QR code.
Display on a projector or print. Students scan with any smartphone camera — no app required.
Students visit crs.app/feedback and type the code. Works on any device with a browser.
Session Analytics
After a session ends (or while it is live), you can view detailed analytics from the session detail page.
AI Insights
CRS uses AI to automatically analyse qualitative responses and surface actionable teaching insights.
Summary: A concise paragraph summarising overall student sentiment and engagement.
Strengths: Topics and teaching aspects that students responded positively to.
Areas for Improvement: Concepts or delivery aspects that students flagged as unclear or difficult.
Recommendations: Specific, actionable suggestions for the next class or session.
Category Insights: Grouped breakdown by question category (clarity, pacing, content, etc.).
AI Insights are generated on-demand. Click the "Generate AI Insights" button on the analytics page. Generation typically takes 5–15 seconds depending on the number of responses.
CLO Mapping
CLO (Course Learning Outcome) Mapping allows you to align exam questions with your defined learning outcomes using AI-driven Bloom's Taxonomy analysis.
Create a CLO Set
Navigate to CLO Mapping → Create CLO Set. Assign it to a course and add your CLOs with Bloom's Taxonomy levels.
Upload Exam Questions
Upload a PDF or Word document (.docx) of your exam paper, or paste questions manually. The system extracts individual questions automatically.
Run AI Analysis
Click 'Analyse with AI'. The system maps each question to relevant CLOs, assigns Bloom's levels, and scores relevance (0–100).
Review Results
Browse the 4-tab results panel: Overview (KPIs), Bloom's Distribution, CLO Coverage (attainment levels), and per-question mappings.
Act on Recommendations
The system flags questions needing improvement and suggests revised versions to lift assessment quality.
Attainment levels follow OBE standards: Level 0 (Not Met), Level 1 (Partial), Level 2 (Met), Level 3 (Exceeded). These are computed from coverage percentage and average relevance scores.
For Students
Joining a Session
Students do not need to register or install anything. Access is entirely browser-based.
- 1. Open your phone camera.
- 2. Point it at the QR code on the screen.
- 3. Tap the link that appears.
- 1. Open any browser and go to the feedback URL.
- 2. Type in the session code shown by your instructor.
- 3. Press Enter to join.
Sessions are time-limited. If the session has ended, the system will inform you. Contact your instructor if you believe the session should still be open.
Submitting Feedback
Once inside the session, you will see the questions prepared by your instructor. Answer each question and press Submit Feedback when done.
Answer all questions
Work through each question at your own pace. You can scroll up and down to review your answers before submitting.
Submit
Press the Submit button at the bottom. A success confirmation will appear. You cannot re-submit.
You can skip optional questions if you don't have an answer. Required questions are marked with an asterisk (*).
Anonymity & Privacy
CRS is designed with student privacy as a core principle.
No login required: Students in public sessions never create an account or provide personal information. Restricted sessions use email only for access delivery — not stored with responses.
No IP tracking: Responses are not linked to device identifiers or IP addresses.
Instructor cannot identify you: Teachers only see aggregated analytics and anonymised text responses — your email is never attached to your answers.
One response per student: The system prevents duplicate submissions per session without identifying who submitted.
Key Features
AI Analytics
Sentiment analysis, pattern recognition, and actionable recommendations generated automatically.
CLO Mapping
AI-powered alignment of exam questions to learning outcomes with Bloom's Taxonomy classification.
Anonymous Responses
Feedback is never linked to a student's identity. In restricted sessions, emails are used only for access — never attached to answers.
QR Code Access
One-tap joining via QR. No app required — works on any modern smartphone browser.
Real-time Results
Watch responses come in live. Analytics update instantly as students submit.
Question Templates
Build reusable question sets with 5 question types: rating, boolean, MCQ, text, numeric.
PDF & DOCX Upload
Upload exam PDFs or Word documents (.docx) and let the system extract and analyse questions automatically.
Rich Analytics
Per-question breakdowns, response distributions, trend charts, and completion metrics.
Restricted Sessions
Invite-only sessions via email. Each student gets a personal link — only enrolled students on your list can submit.
Frequently Asked Questions
Do students need to create an account?
No. Students join directly with a session code or QR code — no registration, no email, no password.
Can a student submit feedback more than once?
No. The system prevents duplicate submissions per session. If a student accidentally closes the tab before submitting, they can reopen the link and continue.
How long does AI Insights generation take?
Typically 5–15 seconds. The time varies based on the number of text responses. Once generated, results are cached and load instantly on subsequent views.
What file types can I upload for CLO mapping?
PDF and Word documents (.docx) are supported. The extraction engine reads text-based PDFs and standard .docx files. Scanned image PDFs may require OCR pre-processing before upload.
Can I export analytics results?
Yes. All teachers can download their data (sessions, responses, CLO analyses) as CSV files from the Profile page under 'Download Your Data'.
What is the difference between a public and a restricted session?
A public session is open to anyone with the code or QR — no account needed. A restricted session is invite-only: only students on the attached student list receive a personal email link and can submit. Restricted mode is ideal for graded or controlled assessments.
A student says they didn't receive their invitation email. What should I do?
Open the session card and check the invitation status panel. If the student's entry shows "Failed", click the "Retry" button — this resends the email immediately. If it shows "Pending", click "Send Emails" to dispatch all unsent invitations. Advise the student to also check their spam/junk folder.
Can I add more students to a restricted session after sending invitations?
Yes. Update the student list to add new email addresses, then click "Send Emails" again on the session. Only students who have not yet received an invitation (status: Pending or Failed) will get an email — already-sent invitations are not re-sent.
What happens when a session's end time passes?
The session status automatically changes to Completed. Students can no longer join or submit. All responses remain available for analytics.
How do I contact support?
Email us at classresponsesystem@gmail.com. We typically respond within 24 hours on business days.
Still have questions? We're happy to help.
classresponsesystem@gmail.com